Wednesday, March 25, 2015

Back in the kitchen.....well, the dining room (which is where all the good crafting happens).

Hello blogging world!

It has been a very long time since I have posted anything.  And I certainly have missed it.

We moved and got very busy with house renovations, then morning sickness as we found out we were expecting our third, who arrived in June.  Life is finally back into a bit of a "normal" swing and I can't wait to start sharing some of the stuff that we have been up to.

Because I have baby brain, and babies on the brain, a lot of my recent projects have revolved around little ones.  We are cloth diapering full time and I am always looking for the best and most frugal ways to do things.

We have been absolutely blessed with great deals on second hand fitted cloth diapers and built up a very nice stash slowly for a really reasonable price.  Because we are using fitted diapers, they also require a cover and we have found wool covers to be comfortable, great for our little ones very sensitive skin, and cheap (now that we have discovered making our own!).

So, here is what I have made so far!  I have a fabulous friend who had a wonderful stash of 100% wool sweaters and was happy to share and we are splitting the goods.

My first night of sewing I was able to make 6 pairs of longies!


All these pairs (except for the top center ones) were made using the arms of a sweater.  They literally took me about 15 minutes per pair from cutting to wearing!  I am not one to usually just wing things my first time through so I followed an excellent tutorial at The Sewing Dork.  She added elastic to her waistband, but I just made my waist bands about 2/3 the size of the actual waist and went without elastic.  I also haven't added any cute little embelishments yet, but I think some stars and pockets might be in the works!


These sweet little soaker capris are the ones from the top center picture above.  My friend really wanted some capris for the summer season and I am so glad she thought of it because they are SUPER cute!  I made these ones using Max and Meena's Maxaloone's pattern.  It was also really easy to follow and I love the contrasting color bum patches!  The leg cuffs also roll down to make them full length when the summer evenings cool down.  Cutting and sewing for this took me about an hour - maybe a bit more, but I had to nurse several times in between cutting and sewing.


Sorry for the dark picture but here is my handsome little guy trying out the black pair of longies made from the sweater arms.  The fit is awesome!


The final pattern that I tried was Katrina's Sew Quick Soaker Pattern.  I really liked this pattern because it was easy to sew in an extra layer of soaker.  So both the red and black shorties and longies have this extra layer and they have great absorbency.  


All in all it was a great project and I am super excited to have 7 new pairs of pants/capris for my little guy.

Give it a try!  And let me know how your projects turn out.

Nadine

Thursday, January 30, 2014

Back to Work....

Hello world :) It has been a very long time since we have done a blog post! Well, it is no secret that consistency is a struggle for me and I have been on hiatus from many things. Mostly in part because we moved to a new city (well, pretty much out into the country) this summer and then found out we are expecting our third child so I have been out of action for a bit. However, now that life is settling down again, I felt that old nagging feeling to do some crafting.

Setting up our new house has been a wonderful, fun and tiring experience. We have pretty much painted the place head to toe and made it our own. And now, I am settling in and really starting to decorate more. We are very visual people in our family and so I have taken on a few craft projects (as always, inspired by Alicia!) that would be great visual representatives and pieces of art for the family. The first one we attempted was our family rules.

Hubby and I took some time to really think about what is important to us and what is important in how we raise our children and we really wanted to focus on the character traits that we are trying to build in them. I googled several other great blogs that had also created similar rules and artwork and took a lot of inspiration from them. Myra over at My Blessed Life had some great family rules done in an artistic style that totally appealed to my sense of style. Rachelle, who is the mommy blogger at Fingerprints on the Fridge, also had some great ideas and a wonderful step by step tutorial that got me started!

We chose the perfect time to take this project on because Michaels Art Store had all their canvases on sale so we were able to get decent size canvases for a decent price. After buying a few foam paint brushes, a large bottle of matte mod podge and a different paper pad each, the project cost about $40 each.

So, following Rachelle's instructions, I painted my canvas a nice green color that goes well with the yellow walls in our new place. I spent a good hour or two choosing the papers that I liked and putting them in an order that seemed to balance out wild and crazy with a little more subdied.  I tried to stagger my rules so that there was a mix of longer ones and shorter ones and that they made some sort of sense in order at least in my mind.  And this is what I got!  It felt like a long process, it took me 2 days to complete this project - but it was a lot of fun.  I spent a couple hours the first night and several hours the next day to finish it all up.  I was very greatful for my cricut machine that allowed me to cut out the lettering in the sizes and fonts that I liked and saved me having to try and hand paint anything.

As commented on many of the blogs I read on this project, the paper did wrinkle and ripple as modge podge was applied.  Despite my best attempts and sureness that I had worked with paper tons and would be able to get it to stay flat, it did what it wanted.  So, if you decide to take on this project, be forewarned!  It will wrinkle and crinkle, but if you can embrace this, it actually does add an authenticity to the project making each piece quite unique and now that it's done and hanging on my wall I don't notice the bumps much at all.  So here is my final product!

Because I had so much fun making mine, and I have the cricut, I also helped Alicia with her family rules as well and it's amazing how different they both are, but they both totally suit our personalities and family homes.  Here is her finished project....


Happy crafting and don't forget to let us know if you decide to make your own family rules!  

Nadine

Friday, March 22, 2013

A free giveaway!!

Good morning everyone :)

A free giveaway is coming up!  We are trying to build up our pinterest interest in our Easter Ebook.  We are going to be doing a free giveaway when the followers for Nadine's pinterest page reach 50!  Be sure to tell all of your friends.

To follow me, just click the red button on the left side of our website that says "Follow me on pinterest".

Also, we need to know, what would you like to see more of on our blog?
We have done a lot of random things in the past....eco house cleaning, gardening, homeschooling, cooking.
What peeks your interest the most?

Cheers,
Nadine

Thursday, March 21, 2013

Some of the Easter crafts from our home!

Hey everyone,

There has been so much talk going around about our new Ebook I wanted to share some of the crafts that have been done.

Over at A Moment in our World Stacey has posted pictures of the crafts she and her kids did.

And here are a few final products from my household:

 
The eggs are from the craft and teaching on how Easter eggs relate to the Christian celebration of Easter!  I think this project was really cool because it was done using all natural products (and it's edible afterwards!)


My DS had a fun time creating our palm leaf here, but had more fun dancing around with it to worship music afterwards :)  Should have got a video....


Nadine

Hey everybody! Very exciting, we are starting to get in the reviews on the Ebook The Bunny, The Egg and The Cross and have some awesome bloggers for you to check out as well :)

The first review to come in was from Stacey over at A Moment In Our World.  She is a stay at home momma from Australia who homeschools her 2 boys.  The review was really great and she also has some links up on her blog to some wonderful resources that she has developed that are available on Teachers Pay Teachers if you are looking to incorporate school work that is Easter themed as well many other educational resources.

Thanks Stacy for supporting us!
Nadine
A Moment In Our World

Sunday, March 17, 2013

Back in the Kitchen

Two Hens In The Kitchen - The Bunny, The Egg and The Cross - an Easter teaching Ebook for 2-6 year olds Hi everyone!

I know it has been a long time since we have been in the kitchen and sharing what is going on.  Life has been crazy busy and I am about to introduce some of the craziness right now!

I have been working on my very first Ebook(!); The Bunny, the Egg, and the Cross.  It is a basic program for parents with kids ages 2-6 (or even up to 8 or 10) that covers the Easter story from Palm Sunday to Easter Sunday with a craft and short devotional each day.  There are also 2 extra crafts to show your children how the Easter bunny and Easter eggs can be applied to the Easter story as we know it.

I was inspired to write this book after using Truth in the Tinsel with my kids over Christmas.  They loved the short easy crafts and the little discussions that went with each day.  I searched madly for something similar for Easter.  However, I didn't find anything, so, I went to work....in the living room rather than the kitchen for once!

So, without further ado, here it is:

easter egg bunny teaching homeschool christian


Download the Ebook as a pdf printable file for only $4.99 just in time for Easter!!!


Add to Cart View Cart -->

Blessings to all!
Nadine


Thursday, March 1, 2012

The Star Jar....

Okay, so Alicia's sons teacher had the coolest idea!  It is human nature to focus on the things in our lives that are hard, frustrating, challenging, aggravating, maddening, hair-pulling.....you get the idea.  So, what can we do to help teach our children to focus on the positive things in their lives?  Or to look at the positive things about themselves?

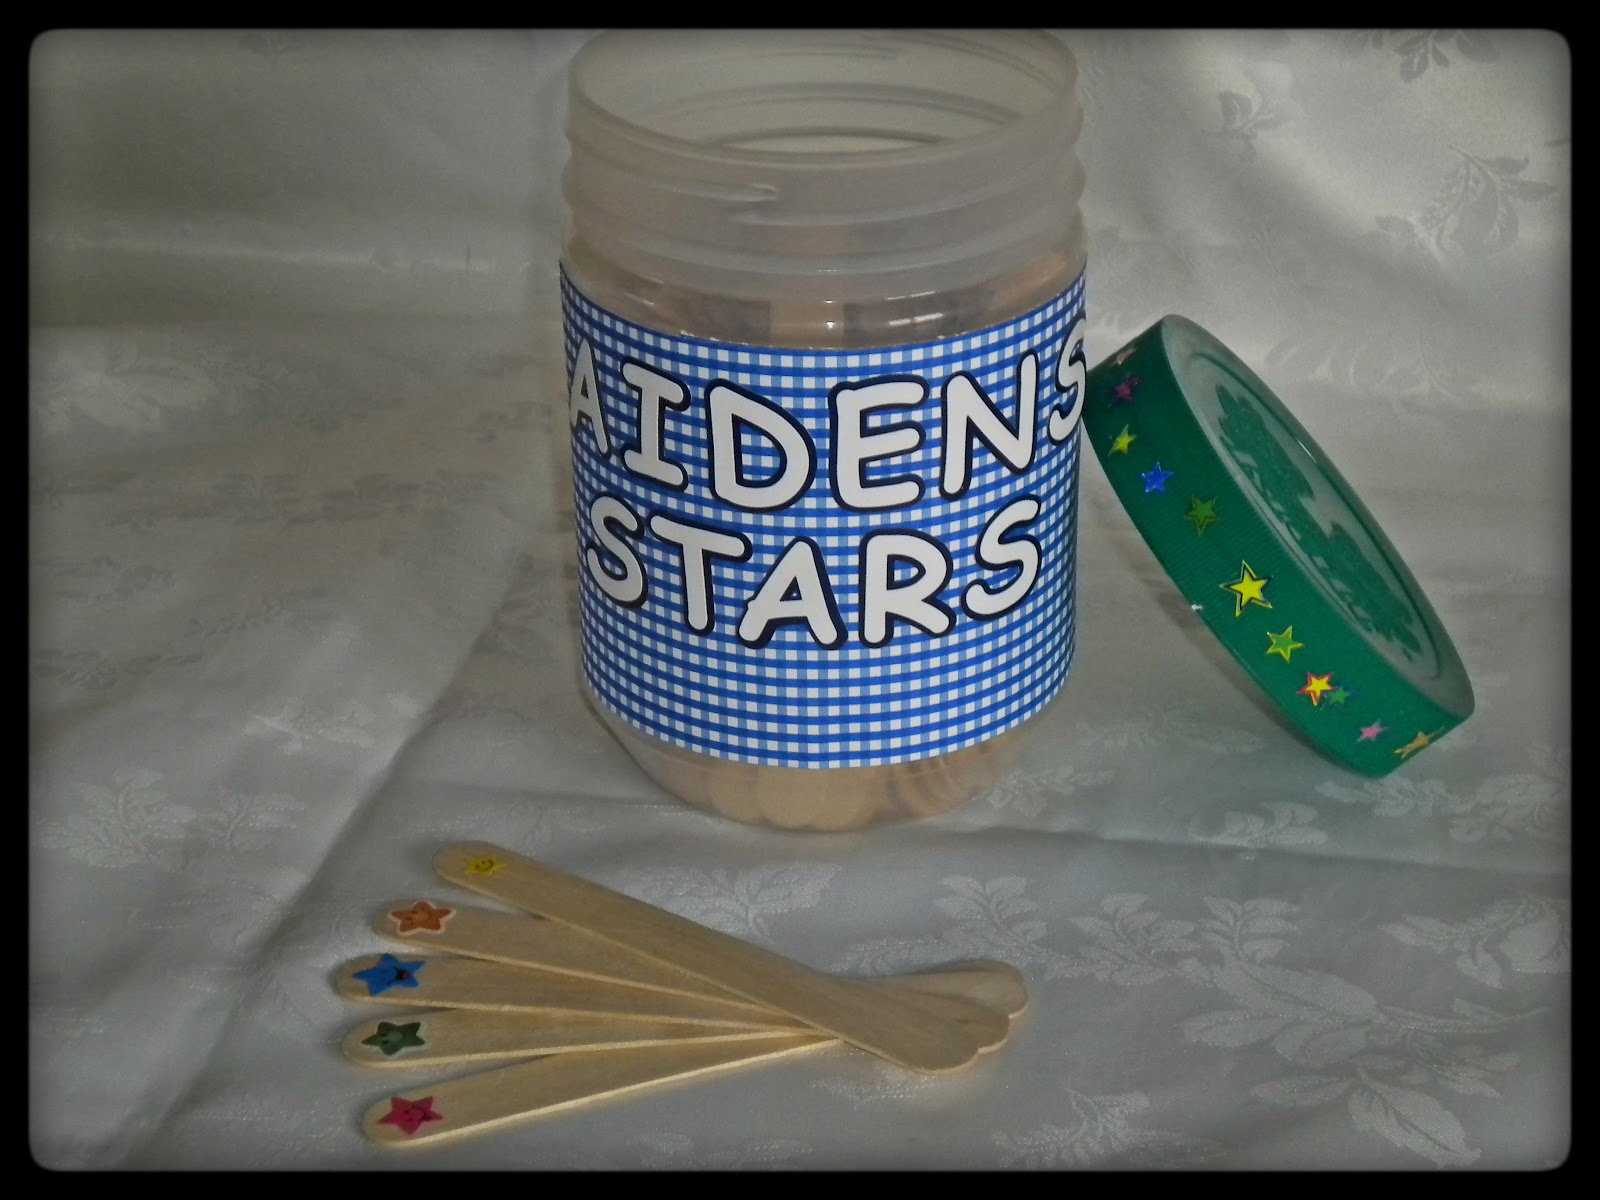
So, here is what we came up with!  An upcycled kraft peanut butter container decorated with paper and stickers from around the house.  Easy to personalize for each child!

And inside, there are large sized popsicle sticks for either you or you and your child together to write on all the things that they are good at, "stars" at!  I happened to have enough star stickers to put a star at the top of each popsicle stick!  (By the way, I was able to find these sticks at the dollar store for $1.50 as opposed to the $5 we paid last time at Michaels!)

So, what kinds of things do you do to encourage your children and promote a healthy self confidence?

Blessings, Nadine

Wednesday, February 29, 2012

Pinterested......are you?

Okay, so I am sure most of you know about Pinterest but what do we do with all the pins that we create?  Is anyone actually using them or doing anything with all the cool things we see?

I know for sure a few friends have tried things out.  My friend Deana, over at Little Pink Cupcakes made the really cool laundry basket tower for dealing with piles of unwanted laundry.  My friend Dot, over at Busted Button was actually the creator of one piece I found floating around on pinterest.  So, I figured it was my turn to do something.

My little guy and I tried out the homemade crayon recipe!  Who doesn't have kids and a million little half pieces of crayons?  But the question was, how good would these new crayons be?  Better than the not so great $1 pack of crayons from the dollar store or the cheap bin at Michales?  Good enough to compare to the $5 pack of crayola crayons?  Check it out...

 
First, you have to find all the bits and pieces, peel the  paper off of them, and break them into smaller pieces (a pair of kitchen shears can be helpful here!).
 
Next, you get your handy dandy helper....
Who beautifully fills small silicone muffin trays with the broken crayon pieces.
Preheat the oven to 235 degrees and bake for 15 minutes or until crayon pieces completely melted.

I found in our new convection oven that we didn't need a full 15 minutes, just keep an eye on it.
Once done, let the new crayons cool completely in the trays.  Once they are completely cooled, they can be popped out and used or packaged for sharing!
So, to answer my own question....yes, new crayons can be made out of old pieces in a relatively painless, cheap and simple way!  The cheap crayons don't do as well as their more expensive counter parts.  We had a few cheap crayons in the mix and they seemed to lose most of their color and the wax floated to the top.  We rubbed the cheap wax off the new crayons and they worked great after that!

Got any great ideas for making new crayons or what to do with them?  We would love to see and hear from you!

Blessings, Nadine.

Monday, February 27, 2012

The Green Pasta Experiment

Ok, so I admit it, it was my drawer.. but I'm sure you can all relate to that one drawer in your kitchen where everything ends up.. and by the way, I only have 3 drawers in the kitchen so the stuff has to go somewhere! As Nadine had mentioned, I did bribe her with lunch in exchange for her organizational skills.

Here is the recipe I saw on Pinterest and then later found on my friends Facebook status.  I kept everything relatively the same, however, I used rice pasta (to stay gluten free) and I added about 1-2 Tablespoons of basil/tomato goat cheese.


The picture is of the full recipe. The recipe was a great size for the two of us to be completely full after licking the bowls clean, I mean eating everything off our plates.  My one suggestion if you are planning on trying this one out, is to go light on the lemon juice.  I didn't have any actual lemons on hand so I ended up just using lemon juice from the bottle - we both found it on the verge of being too lemony..is that a word?  Lemony?  Well it us now and I'm sure you know what I'm talking about!

So would I try this recipe again?  Absolutely!  Do I think my picky eaters at home would eat this for dinner?  Absolutely not... I think it would be too green for my DH and well the kids aren't into the exotic green colour of the pasta.  But I have promised myself that one day I will convince them to love avocados just as much as I do.. speaking of avocados, I should share my guacamole recipe with you soon.. mmm so good!  Until next time,

Happy Eating!

Alicia

Saturday, February 25, 2012

A Day Full of Randomness

Ok, so honestly, most of the week has been full of random inefficient  mostly unsuccessful days :)  Other than a few organizational genius events here and there!  But in all excuse making fairness, my oldest has been home with a chest cold all week and my little one now seems to have the stomach flu.  But despite all that......craftiness happened! 
Pin It

I got tired of everyone asking who the girl in the picture frame was! (I don't know, she came with the frame, honest!)   Why I had her in the frame still years after being given it, I don't know......


But it was all worth it because look at it now!
I cut out a circle of pink card stock and prettied it up with some scrapbooking accessories that have been lying around unused I have been dying to use for ages!

The glass was still intact (which is a miracle in my house) so after a good clean with some Bon  Ami I have a dry erase "To Do List" on my kitchen counter that can be updated easily and is in site for quick reminders!

The other randomness of today?

I took a few minutes to admire my always clean and organized bedroom closet....


And yes, the closet is ALWAYS this clean and tidy!  That's why I didn't get a picture that showed the mess on the floor all around it.  And no, the cupboard doors aren't really purple, nor are there really butterflies, bumblebees and fairies on the wallpaper in our awesome master bedroom.

Spent a little time on pinterest looking for a way to do my hair without having to brush it.....


We did a quick safety check around the house today....

We're good.  There will be no falls in our home today from a height of greater than 3 inches! Whew!  Thank goodness for that :)

Not sure how we ended up with this set-up but he seems to like it so I won't complain!


And then it was time for a daily adventure.  We adventured a whole 3 blocks in the car in the pooring rain to help a dear friend with some organizational issues...

So all of the things on the counter came out of that one drawer that
is open in the picture below here.  Now everyone has a junk drawer!  We discussed this to help make my unnamed friend feel better.

However, not everyone has this much junk in their utensil drawer!

But she bribed me with some delicious lunch to organize it for her!  I got so distracted by the food I forgot to take an after  picture to show everyone.  But don't worry, I'm sure my friend will post one when she shares the recipe for the Pasta and Avocado we ate for lunch.  Stay tuned!  And feel free to share with us any of you unproductive activities...

Thursday, February 23, 2012

Pizza Fun


I don't know how many times now that I have restarted writing this blog entry.. I think I am a bit rusty at it! Today the sun was shining and the temperature was beautiful on the Island. My oldest was home from school with a bad cough for the second day in a row - but I can guarantee you that he is going back tomorrow no matter what! He was the epitome of stir crazy.

Anyways, a while back my husband kneaded out an extra batch of pizza dough, so we decided to see how well it would freeze. Today I pulled it out of the freezer to see if it would still be as good as the first batch he had made. Low and behold it was! So after a long day of speaking nicely to my children about their volume level when the little one was sleeping... wait who am I kidding, after spending the day arguing and yes out right yelling at them to be quiet while their sister was asleep in her crib, I asked them to help me make supper.

Aiden was more than happy to help with the rolling of the dough. ( Speaking of the dough you can find the recipe at the bottom of this post.) After we rolled it out we cut it into circles using whatever I could find, which happened to be a pyrex round dish that worked perfectly. As you can see Aiden was having a blast being a "cooker" as he would call it!

So after rolling out the dough we cut half of it into circles for the kids to "decorate" themselves. Zoanna had no problem deciding what to put on her pizza, o and don't worry there was no confusing whose pizza was whose... Zoanna was very concerned about that - funny thing is when we served the hot pizza at supper she looked at me and said "Mom, you know I don't like to eat pizza" haha..made me smile.

I guess in the end, my day wasn't so terrible. I managed to find a rainbow among the storm clouds of stir crazy children! The moral of the story as you can plainly see is... well I don't know what it is. I just know that I love those smiling faces! AND we enjoyed cooking together. So how do you combine your favorite things? I love being in the kitchen and I usually like being in there alone, but this time for pizza making, I can make an exception!

Happy Eating!

Alicia


Pizza Dough:
2 1/4 tsp Active Dry Yeast
1 1/3 Cup warm water
3 1/2 - 3 3/4 Cups Flour
1 Tbls olive oil
1 Tbls sugar
1 Tbls salt
Cornmeal

1. Combine yeast and water and proof it.
2. In separate bowl combine the remaining ingredients.
3. Add proofed yeast and water mixture to dry ingredients and knead for roughly 10 minutes, until dough is soft and no longer sticky - adding flour as needed.
4. Cover and let rise until double in size, around 90 minutes
5. Preheat oven to 450 degrees
6. Roll dough into a ball and let rest for 10 minutes.
7. Prepare your baking pan by dusting it with a layer of cornmeal
8. Using your hands or a rolling pin, shape dough into desired shape
9. Place dough on prepared pan.  Brush with extra oil and dent the dough with your thumb to prevent air pockets from forming when the pizza is cooking.
10.  Top your pizza with all your favorite toppings and bake in the oven for 12-15 minutes.

Enjoy!

As an aside note, after step 4, you can wrap your dough ball in plastic wrap and freeze it for another day.  We often double the recipe so we can have a meal that night and plan ahead for another meal.  See our menu boards for some ideas on how to plan ahead.

And yet a little more organization....

Okay, I think that I have just spent the best $3 ever!  I decided to continue on with my organizing spree, but I wanted to pick an area that really needed a pick me up.  Funny enough, the area that first came to mind was under my kitchen sink.  It was overflowing with recycling, stained on the bottom from past water leaks, and just ugly and disorganized.


Okay, so I did happen to take out the recycling and clear away some of the clutter before remembering to take the before picture.

I picked up 2 rolls of contact paper at the dollar store for $1.50 per roll, and 2 new baskets in pink that picked up the pink pinstripe in the contact paper.  And there was enough left over to cover over the garbage can as well...

Voila.....a much more appealing cupboard!


And one final touch, I needed a place to store the
                                                                                rubber gloves as I got rid of the old container that held several pairs.  I used a fancy clothes pin bought a while back at Michaels (6 epoxied clothespins for $1.50).  I stuck it on with doubled sided foam tape and I now have somewhere out of the way but easily accessible to hang my gloves. 


Tuesday, February 21, 2012

A little more organization never hurt anybody!

So lately all the blogs that I have stumbled across or follow have been talking about organization!

I signed back up for Fly Lady, which in the past, has done wonders to help me keep my house functional, clean and organized.  It's really worth checking out.  You get daily emails with a 15 minutes task to do, special challenges, and monthly focuses.  It's an awesome cleaning plan where they constantly encourage to do what you can when you can.

I also stumbled across a blog, that initially I told myself I would NEVER look at :)  And you know what happens when you say never!  My initial issue was that I read the blog address (and therefore the blog title) wrong.  The blog address is www.imperfecthomemaking.com.  Now, it would make sense to read it as imperfect homemaking, but I however only saw I'm Perfect homemaking.  Maybe a sore point I need to deal with?!?  This site has a great series done back in October on 31 days to organizing your home.  I did day one and loved the changes.  Picture is coming, i forgot a before  picture, and i will take an after one once DH hangs the new photo frame turned white board for remembering what is in the bin to give back to others!

And that was it, once I started, I just couldn't stop.  I saw a neat  picture with cool jars for keeping laundry soap in.  Well, I want to display my homemade laundry soap in a pretty jar too, along with the extra baking soda and vinegar for stains and smells.  This time, I did remember the before and after pics. 


Pin It
So, what cool things have you guys been doing to organize your household?


Sunday, February 19, 2012

Homemade Laundry Soap

I guess it has been about just over two years ago that we bought our second largest appliance purchase - our front loading LG washer and dryer. Funny enough we had to sell them when we moved from Alberta to BC in December (now the cleaning pair sits in Nadine's laundry room!). Being the first time we owned an HE washing machine, I had to take a harder look at the laundry soap that we were using. My husband's parents had purchased an HE washing machine and, unaware of the importance of the type of laundry soap they needed, they used regular detergent. In about a year they had to do some serious repairs because of the damage caused by too much suds and bubbles. So in their hard learned lesson I knew that I needed to find an alternative. At first we started by using Costco's Kirkland HE laundry soap, but soon realized that the price was pretty high despite the savings being that it was from Costco. So in conversation with my good high school friend living in Ontario, I found my first solution. Here is the recipe of the first attempt at making homemade, eco friendly laundry soap:

1 Bar of Soap, grated
1 Cup Washing Soda
1/2 Cup Borax
3 Gallons of water

Bring 4 cups of the water to just under a boil, add the grated bar of soap, stir until dissolved
Heat 3 gallons of water - I just turned the kitchen tap to the hottest setting
Add the washing soda, and Borax to the 3 gallons of hot water, stir until dissolved
Add the soap mixture, stir and let set for roughly 24 hours.
Use 1 Cup of "gel" for every regular laundry load.

Now I found that this laundry soap worked extremely well for us. At the time we had a potty training youngster who had more than a few accidents in bed and in their clothes, and every time this detergent would get the smell out. The one major downside to this recipe was the space factor. Finding a container large enough to hold the "gel". As well, the mixture would separate on occasion - no big deal really, I just kept a long wooden spoon on hand to mix back together.

I used this for about 6 months or so when I found myself talking with my same friend from Ontario. She had come across a new laundry soap recipe that she enjoyed. It goes something like this:

1 Bar of Soap
1/2 Cup Washing Soda
1/2 Cup Borax
1/2 Cup oxi-clean (optional)
5-10 drops of essential oil (I use lemon)

Mix all ingredients together
Use 1-2 tablespoons depending on the dirtiness of your laundry load.
Enjoy! Alicia.

I would have to second all that Alicia has to say :)  This laundry soap is amazing! It's cheap!  And it works.  And for those of us who live on the peninsula, you only need to use 1/2 tbsp per load as the local residential information is that we only need half the recommended amount of soap due to our very soft water conditions.

Nadine :)

Saturday, February 18, 2012

Menu Boards....

Okay, I am totally blaming Alicia for the fact that we have not blogged in over 5 months! She had a baby and I have been very preoccupied staring at her little bundle of cuteness. But all excuses aside, we have a super cool kitchen related project to share with everyone.

I stumbled upon the inspiration for this board at Robby Gurls Creations which i stumbled across through pinterest.

We have been talking about trying to meal plan for ages. We know for sure that when we meal plan our grocery budgets are better, we are more likely to have dinner made on time each night, and we have way less stress. So, without further ado, I introduce you to our menu planning boards....


This is my board, I did mine in primary colors just to add a little bit of color and excitement to my kitchen. (And hopefully it will keep my eyes from glossy over and forgetting all about it!)

For each day there are small tags to remind you what you will be making for dinner that day. The hanging file cards at the bottom are color co-ordinated to match the small tags depending on the types of food category.

We made 6 categories of recipes:
chicken, beef, side dishes, soup, desserts, & miscellaneous

The board is then accessorized with fancy magnets to hold up the small tags and the month labels.  We priced things out and all in all it ended up costing about $40 to make the boards.  The biggest cost was the board itself, which we were only able to get at Walmart for $19.97.  The paper and stones came from Michaels Art Store.  The binder rings were a dollar store find!  The button magnets and magnet tape can be bought at Walmart as well.

(And while I think of it, for you technies who notice each detail...yes it says that Alicia wrote this post, but it was actually me (Nadine)).

Here is Alicia's awesome board!  She went for a blue and green color theme with the same recipe categories.  Now, our job over the next few weeks is to print out our recipe cards to make this board fully functional.

Pin It

Monday, August 8, 2011

An exciting new recipe!!!

I know, so it has been far too long since I blogged. It's been a very very busy summer. But, during a quick quiet moment, I wanted to share this fabulous new healthier and cheaper salad dressing recipe that is incredibly good!

Here is the RECIPE . You can adjust the serving sizes on the website. I served it at a church potluck this weekend and it was a hit with all who tried it!

Give it a whirl and let me know what you think.

I will try and write again soon and let you know about all the cool canning we have been up to! (Including; tomato sauce, tomato paste, pickled garlic, dilled carrots, blueberry jam, blueberry lime jam, plum jam, plum sauce, apple butter, blueberry butter, blueberry syrup, and more!)

Cheers,
Nadine

Tuesday, July 19, 2011

So summer is here in almost full force! My ankles and feet are swollen and I feel like all I do is complain about being pregnant and hoping that the baby comes early. I need to stop. So if I have called or talked to you in the last month or so, I need to apologize for my complaining attitude. I am remembering that I asked for this baby, no let me rephrase that... I begged God for this pregnancy and I need to come back to that spot in my life when I didn't know whether it would be even possible to have another baby. So here is my confession of my horrible attitude. Please forgive me.

Now on to a more positive note... in 8 months of being pregnant I had gained 11 pounds and then turned around and lost 6 pounds this past month. I must say that it feels really good! I think I can contribute the loss to two specific things - Thetis Island BC and eating locally. A few weekends ago we spent a few days with our church family at a retreat center that was built on the side of a hill. I was definitely sore when I came home! But I believe the major reason is because of my food choices. As of today I still have local beef in the freezer and we were also able to add 4 local organic chickens to our freezer collection. I just need to plan my meals ahead before I can tell you how delicious the chickens tasted. Besides getting our local food box I have been running over to the Root Cellar to supplement our fruits and veggies. I also have been picking up eggs at a local farm for $6.75 for two and a half dozen. As an aside, that's the same price as our local Costco (where do they get their eggs from? I have no idea!).

Ok, so to keep this a bit shorter I will get to the amazing recipe I made tonight... thanks Nadine for calling and rubbing it in how good your supper was! I'm not sure where she found the recipe but this is my version of what she excitedly told me over the phone about an hour ago:


Ingredients:
Bunch of Kale - stems removed and chopped
1/2 tsp cumin and paprika
2 cloves of garlic
splash of lemon juice
olive oil

Directions:
Add olive oil and garlic to pan
Saute Kale with the spices
When wilted add a splash of lemon juice and serve.

I ate this with my improvised whats-in-the-fridge stirfry. Wow it was amazing!

So the moral of this post is don't forget to make the small changes in your food purchases to become a healthier you! I started by doing my best to buy only Canadian produce and meats, if you have mastered that then perhaps try to eat more food from your province and the last thing is trying to eat from your specific region. It does become easier over time once you can find the resources in your area!

Good luck and happy eating!


Thursday, June 2, 2011

Wonderful new recipe!

So, many of you have been asking where we have been. Well, I haven't been in the kitchen for awhile. But this week I made bread for the first time since moving here in February. Can't believe it took me this long. It must have been a cooler day because the dough took FOREVER to rise. I finally was able to put the bread in the oven around 8:30pm, after the kids were in bed. We decided it would be a great time to watch a movie and call it a night...well lets just say the movie went on and the bread stayed in the oven a little longer than expected. But don't worry, nothing was lost.. just a little bit browner than usual. That was on Monday and we only have one loaf left out of four.


Anyways, on to the amazing recipe we had for supper tonight. I have been trying to figure out how to include more beans/legumes in my diet. I usually have chronic low milk supply when my kids are nursing so I'm starting early trying to find some good recipes. My friend in Ontario, you know who you are supermom! gave me a few suggestions - refried beans in the slow cooker (which I tried and loved, I'll post about that later) and this recipe for a vegan alternative to Sloppy Joes. I tweaked the recipe slightly by adding some homemade BBQ sauce, recipe to follow, I also used 3 Tbsp of chili powder and a yellow pepper instead of green because thats what I had on hand. I served them on homemade no-knead hamburger buns. Wow, was I ever impressed!! Even the hubby enjoyed them, which says a lot because first off there was no meat and secondly it was made out of lentils, which is not high on his preference list. I will definitely add this recipe to my collection for future meatless Thursdays, or whatever day of the week I feel like making them! Below is a copy of the BBQ sauce we had made earlier in the week, as well as the hamburger bun recipe.

BBQ Sauce:
1 Cup Ketchup
1/2 Cup white Vinegar
1/2 Cup Brown Sugar
1/2 tsp Dry Mustard
garlic powder to taste
Worcestershire Sauce to taste
A few shakes of Liquid Smoke

Combine all ingredients.

Hamburger Bun Dough:
6 1/2 Cups flour
2 Tbsp INSTANT Yeast
1 1/2 Tbsp Salt
1 Cup Sugar
1 1/2 Cup Milk
1 1/2 Cup hot water

Measure out flour into large red tupperware bowl (my all-time favorite bowl for mixing bread doughs! - I like the old red colour the best but tupperware didn't agree with me). Add yeast and salt to flour. In a separate bowl combine sugar, milk and hot water. Pour into flour mixture. Stir mixture together until the dough forms a lumpy, sticky mass. Cover and let rise for 2 hours, or however long you have. Use right away or refrigerate for up to 3 days.

Forming the Buns:
Flour your hands generously, because the dough will be sticky. Cut/rip/pull off chunks of dough in the size of your preferred bun. The size all depends on the purpose of the bun I suppose. Form the lump into any bun shape you want, try not to play with it too much or it will turn out on the chewy side. Place buns on a prepared baking sheet, I use bacon grease that I have stored in my fridge in a wonderful mason jar.. but you can use parchment paper etc. Cover with tea towels and let rest for around 40 minutes. Preheat oven to 400F. Bake for around 15-17 minutes.

The yield for this dough recipe varies based on how big you want your buns...haha...that statement made me laugh...Tonight for instance I only made 6 buns for supper, but I have at least 1/2 to 3/4 of the dough left in the fridge. The recipe came from a great book that I rely on frequently for my no knead dough recipes. You can find it here. Or you can borrow it from my kitchen, with the knowledge that if you lose it you will replace it because I LOVE this book!

Let me know what you think of the recipe if you try it, and hey do you have any tried and true bean/legume recipes you would recommend to a nursing mom?

yours in the kitchen,

Alicia

ps. I just wanted to add that I didn't add the full recipe of BBQ sauce to the Snobby Joes, maybe 1/2 cup or so.

Friday, May 13, 2011

I like Pesto!!!

So, we got our boxes again this week, and they are AWESOME! I forgot to get a picture of everything in the box but I have something better for you.

This week we got:
1 bunch parsley
1 bunch red kale
1 pound strawberries (YUM)
1 bunch of swiss chard
1 bunch of daikon radishes
1 bunch of mustard greens
1 bunch of mizuna
1 head of green leaf lettuce
1 bunch of red beets

So, I am not a huge beet fan, but to be a good host I roasted them all for lunch. They were good, but not something I would jump about eating. I probably wouldn't even help myself to them unless I was really hungry.

This week, I didn't want any of my greens to go soggy, so I looked up proper storing and cutting techniques and started planning early what to do with everything. I got hung up on the daikon radishes though. Do you use radish tops? I had no idea...

So...as usual, when I don't know what to do, I got on the internet! I found a recipe for radish leaf pesto and decided to give it a try. Alicia came over and we made a batch together. I have had pesto before and again, am not a big fan, but thought i would give it a try rather than waste all those tops.


It was DELICIOUS! I would eat it again for sure! I would like to try making some pesto pasta, or a pizza with this pesto on it. It was more "green" tasting than herb.

Give it a try, let me know what you think, tell me what you put it in...
Happy eating :)
Nadine

Monday, May 9, 2011

Bread anyone?!

Okay, so I tried out a brand new spelt bread recipe this am! It was a lot easier than I thought it was going to be and it worked out fabulously! The recipe was to make 1 loaf, but using slightly smaller loaf pans, i made 2 loaves of bread and also added some oatmeal topping just to spice them up.

This recipe came from a random google search which led me here. I was really happy with the spelt bread (it was especially good right out of the oven with some butter and honey on it!).

Because I was already making bread I figured I'd do a few loaves of whole wheat and a few sub style buns as well. Take a look. This is my regular recipe (courtesy of Alicia) and it usually makes 4 loaves, but I used a few of my pans for the spelt bread so decided to try these buns instead. The boys haven't broken into those yet, so I will let you know when the reviews come back.


And here they are....


Happy Eating,
Nadine